Roblox shirt template: How to make your own custom clothes
It's not just a Roblox shirt template, it's the pants too
Updated on 29.03.2022, original article by Jupiter Hadley
Hello and welcome to the PocketGamer Roblox shirt template guide! We'll teach you how to create your items using the Roblox shirt template, as well as the pants and t-shirt.
There are in-app purchases within the Roblox Platform, as well as the ability to create your own games and even items for your avatar.
- Through our Roblox code list, you'll be able to grab some exceptional rewards for free!
Your Roblox Avatar is something that represents your character in all of the games. Many people spend ages trying to make their avatar perfect - and sometimes the best way to do that is through creating custom items for your avatar to wear.
What is a Roblox T-Shirt?
When it comes to catalogue items for your avatar, there are a bunch of different categories. The most commonly made item is t-shirts! T-shirts can be made by any account or user, while other items require different types of accounts. If you have a Roblox Monthly Membership, you can create a long-sleeve shirt and pants for your avatar as well.If you are accepted into the UCG Catalogue, you can make accessories as well, but this is a really tough group to get into and is often closed off from applications - but do keep checking back as sometimes Roblox does open them.
Creating a Roblox Shirt
When it comes to creating a t-shirt, this is actually the easiest thing to make. You just need a 128 by 128-pixel image. This image can be created in anything you’d like - MS Paint or Photoshop for example. You’ll just need to upload the image! If it’s a full square, it will cover the entire torso of your character. Once you have your image, you can upload them using the instructions below.It is worth noting that the T-Shirt can be layered over Shirts, so if you want an image that can then be put on another one of your shirts, you can do that! Maybe make a necklace for your favourite shirt or make a small pattern to layer on top of something cool you already have.
We've also made a Roblox GFX guide in case you need help!
Roblox Shirt template
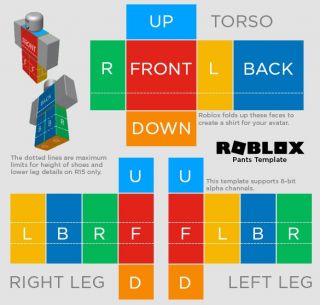
Much like creating pants in Roblox, you will need a Roblox shirt template. This shirt can be longsleeved or short - it’s really up to you. It’s worth noting the colours on the template, as they will help you see how this item wraps around your avatar. Unlike the shirt template, you will need to be designing all of the sides of the avatar - so having a good idea of how it will be folded around your avatar is essential, since it’s a 3D object.To make a shirt in Roblox, you will need to have the following template:

- Step 1: Have a Roblox Membership active.
- Step 2: Save the template to your computer or phone.
- Step 3: Open the image in Photoshop, MS Paint, or whatever program you want to edit it in.
- Step 4: Start coloring over the section you want to design.
- Step 5: Once you are done, save your design and see the below instructions on how to upload it.
If you saved this Roblox shirt template correctly, everything should be the correct size. The --- lines on the template show where the hands will start, so it is worth keeping in mind how long you’d like your sleeves to be.
Roblox Pants template
Unlike the Roblox template T-Shirt, Pants require a bit more time and effort. This item goes around the entire lower half of your avatar, which means you’ll have more area to design and need to think about how the template would look around a 3D object.The template also has a good amount of colour-coding, to help you understand where each side would be and how they connect, but you’ll want to make sure you have a good understanding before you submit your item to upload!
To make a pair of pants in Roblox, you will need to have the following template:
- Step 1: Have a Roblox Membership active.
- Step 2: Save the template to your computer or phone.
- Step 3: Open the image in Photoshop, MS Paint, or whatever program you want to edit it in.
- Step 4: Start colouring over the section you want to design.
- Step 5: Once you are done, save your design and see the below instructions on how to upload.
If you saved this item correctly, each of the sections should be the correct size. The Pants template does have an entire shirt section on it - but you should only be designing up to the ---- line on the Torso. There are notes on the template to explain!
Uploading your creation
Once you have saved the design you want, it’s pretty simple to get the item uploaded!- Step 1: Go to the My Create tab on Roblox (or alternatively, click this while logged into Roblox)
- Step 2: On the left-hand side, choose Shirts, Pants or T-Shirts, depending on what you’d like to upload.
- Step 3: Click Choose File and find your design.
- Step 4: Add a name for your clothing
- Step 5: Click Upload
Once your item is uploaded, it will appear as a temporary icon, which has paper and a pencil on it. Your item will need to be moderated before you will be able to wear it, which can take up to 10 hours at busy times but is often done in a matter of hours. Then, you can wear your creation. If you’d like to sell clothing, you will need to make a group and upload the item to the shop section of the group instead of to your personal creations area!
Of course, you should take a look at our list of best Roblox games in 2022!