Agent A: A Puzzle in Disguise walkthrough - the complete guide
How to track down Ruby

Agent A is a dashing little escape the room puzzler, inspired by games like The Room. It's got keys and combinations and secret compartments, and the rest.
It can also be quite tricky at times, and that's where we come in. If you're here, it's probably because you're a bit stuck and need a helping hand. Below, in our Agent A walkthrough you'll find solutions to every puzzle in the game.
Still stuck? Drop a comment and we'll see what we can do.

Investigate the front door. Tip over the flowerpot to find a key. Grab it, and use it to unlock the panel to the left of the door.

Inside are six buttons. You'll have to brute force the combination. The correct sequence to press the buttons is shown above.

You're in! Look at the vase in the centre of the room and open the top to find a secret button. Hit it, to reveal a control panel.

Take the crank handle from the top shelf. Then press the buttons in the bottom right until all the red and blue lights shut off. We'll come back to this panel later. For now, head through into the back room.

Go straight upstairs to the library. Knock over the lamp on the right and investigate the book pile behind it. Take the magnet, and return to the room with the fish tank.

Look at the fish tank to see a key in the water. Place the magnet on the glass to attract the key. Now move the magnet to guide the key around the maze and to the filtration system on the right. Now open the filter and take the metal key.

Go up the stairs in this room and unlock the door with that key.
 Open the drawer to get Wedge 1

Go into the bathroom. Run the shower until a clock face (showing 12:15) appears on the glass. Open the cabinet and note the symbol on the shampoo bottle. Take Wedge 2.
Move the pots on the left and flick the switch. You'll be in a safe room. Take the telescope from the shelf. Flick the switch again and leave the bathroom.

In Ruby's study, look at the clock and spin the hands to change the time to 12:15. Take the diamond from the compartment.

Investigate the gramophone. Take the record from the shelf and place it on the player. Use the crank handle in the slot. Then spin it until the meter goes into the red. The screwdriver will spit out - take it.

Before you leave, take a note of the symbol on this paper.

Go through Ruby's bedroom, and upstairs to her loft. Look at the egg chair and push the cushion aside to find Wedge 3. Also, move the plant on the table to reveal a Cube. Take it.

Move the plant pots to the positions shown above (to match the ones in the lobby). This will make a tripod appear, and Wedge 4, which you should take. Place your telescope on the tripod. We'll need a lens to actually use it - for now, go back down to the lobby.

Check out the control panel again. Use the yellow cube on the hole on the right. More coloured cubes will appear. Rearrange them to the colours shown above (Red, White, Orange, Blue, Yellow), which matches the painting in Ruby's bedroom.
Take Wedge 5 from inside the new compartment.

Go into the back room again. Look at the alarm system on the door and use your screwdriver to open the panel. Use the diamond to reflect the beam and unlock the back and front doors of the house.

Go outside. Take the glass from the table, and knock the table over. Take Wedge 6 from beneath the pool chair. Open the pool filter and fill your glass with water.

In the next part of the pool area, look at the plant on the right. Take the keycard from underneath its leaves.

Look at the pipe on the left and spin the handle clockwise until it falls off. Grab it and go back inside the house.

Go out the front door, and then investigate the area on the right. Place the handle on the pipe and spin it clockwise to turn off the water.

Go back to the pool area to see that the water has drained, revealing a button. Press it. Take Wedge 7 from the key panel.

To find the combination for the panel, return to the safe room and look at the camera feed. You'll see that the buttons are shown, complete with sticky fingerprints.

Now you can try a few combinations on the panel. The solution is shown above.
 Head inside the garage and open all the cupboard doors. Take the oil can, the two corks, and the plunger. Use the oil can on the hingers of the trapdoor in this room and open it up to take Wedge 8

Outside, Pop the corks into the left and centre pumps. Then go back to the front of the house and spin the handle counterclockwise to turn the water back on. When you return to the pool you'll be able to grab a fish bone from the the water.

Go to Ruby's bedroom and give the bone to the cat. Take the lens from the chair and head upstairs.

Place the lens on the telescope and look inside. You'll see the number "1771" printed on the side of the lighthouse.

Go into the bathroom and turn on the tap. Then use the plunger on the sink to reveal a key. Take it.

Go back to the room with the fireplace and look at the coffee table. Press the buttons in the order shown above to reveal a keyhole. Use the triangular key to open the panel.
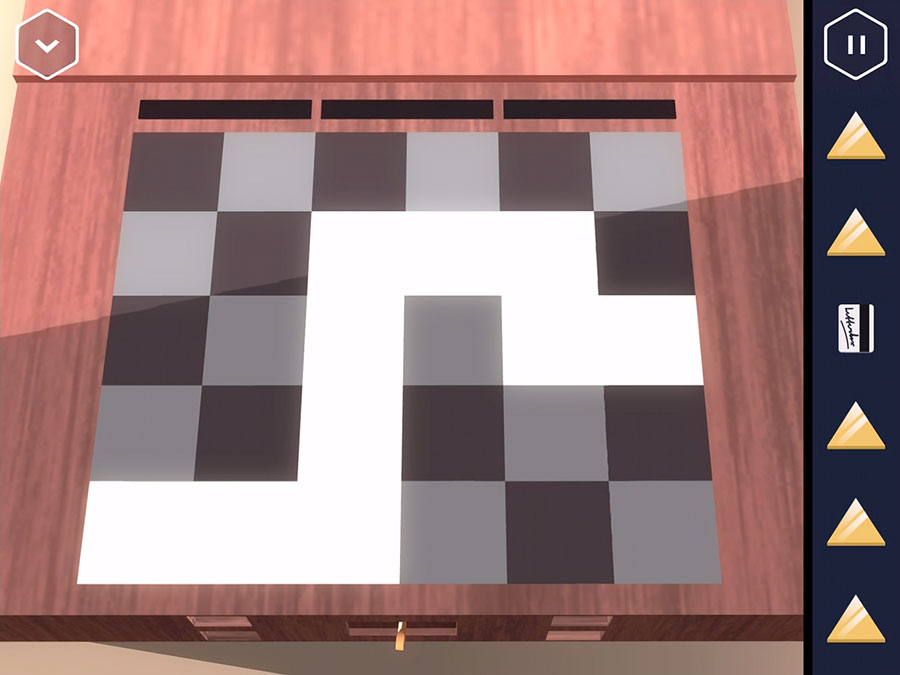


Your next job is to draw three different patterns on this checkerboard. They will appear momentarily and then you must repeat the pattern. To help you out, all three are shown above. Let's continue the Agent A walkthrough.

Take Wedge 9 from inside. And note the symbol on the bottom of the drawer.

Go back to the front garden and look at the electrical box. Note the symbol on the front cover.

You now have four symbols noted down. Right, let's use them.

Look at the machine here, and use the keycard to open the glass panel. Spin the four dials to match the symbols shown above. Take Wedge 10 from inside, and the key.
 Use the key on the toolbox in the garage. Take the hammer, lightbulb, key, and Wedge 11

Use the key to unlock the electrical box outside. Take the yellow fuse and then return to the garage and place it in the fusebox.

Okay, our job now is to move the yellow block to the connector on the right. The final solution looks like the above. Your main concern is getting the two tall fuses to the bottom of the puzzle. When you're done…

Go back to the pool and take Wedge 12 from the filtration system.

Go up to Ruby's bedroom and investigate the box at the foot of her bed. Place all 12 wedges into the slots. Take the ruby from inside.

In the hallway, use the ruby in the yak's eye socket. Wait a few seconds and then take the pianola roll.

Go back to the library. Place the pianola roll in the piano. You now have to repeat three little songs. Using the image above, these are the songs you must play:
BCE
BCEEGH
BCEEGHHGFCB
A secret compartment will open. Take the hacking tool from inside.

Go back downstairs and use the glass of water on the fireplace to extinguish the flames. Then take the tile. Next, take a look at the painting on the wall and slide it back to reveal a safe.

Spin the inner wheel until the dot on this wheel is on the left (by the arrow). Then do the same with the outer wheel. And finally, the middle wheel. The end result will look like the above.

Pop the tile in the empty space. Then spin the tiles so that the pattern looks like the above image.
Inside is a glass window. Hit it repeatedly until it breaks, revealing a broken key panel. You want to use the code 1771 from the lighthouse to unlock the panel. But because the buttons are broken you should use 7667 instead.

Inside is four dials. You want to turn them so all the arrows point at each other. It's actually very easy if you move the left-most dial, then the bottom dial, then the middle dial, and then the right-most one.

Use the hacking tool on the panel. Numbers will scroll down the screen. Starting from the left, tap your device when the white number enters the middle section. Repeat until all the white numbers are shown in the centre.
Inside is some C4 and a button. Take the explosive and press the button.

Go to the front door and smash the bulb with your hammer. Take the pulsating item that falls out. You can replace the bulb with a new one if you like.

Go to the library. Remove the seat cushion. pop the pulsating item in the slot. Take the phone that appears.

Place the explosive on the door. Place the phone on the C4. Note the number: 921981.

Go into the study and look a the phone. Hit the speaker button and enter the phone number above. Enter the door to finish Agent A.Congrats! We hope you found our Agent A walkthrough helpful, please leave a comment below if you need help with anything, and someone from the community will answer for sure!
