Beyond a Steel Sky Walkthrough 3 - Aspiration Platform, travel waiver, recycling centre, Leet and more

The third part of our Beyond a Steel Sky walkthrough, where you'll find puzzle solutions and more
Back again are you? Well I don't blame you, Beyond a Steel Sky is a tough cookie to crack, especially if you haven't got patience. I mean, I don't really have patience either, so don't worry about it.
This is part three of our Beyond a Steel Sky walkthrough, and this time we're going to clean up the Aspiration Platform, get a travel waiver, solve all of the puzzles in the Recycling centre, meet Leet, and finally get access to Graham's locked messages.

That's a lot to cover, but everything is here in this guide, just scroll down for everything you need to know.
And, of course, make sure to see our other Beyond a Steel Sky guides for anything else you need to know. Keep checking back for the full game walkthrough as it is completed.
Previous walkthrough entries Future walkthrough entries
1
Returning to Graham's apartment and the Aspiration Platform

- Return to the apartment via the monopod, and you'll encounter that pesky poet, Reginald, and he'll rant before jumping into the monopod himself
- Once back inside the apartment head into Graham's room and put on his cleaning uniform
- You'll find that if you get into the monopod and try to go to the Recycling centre, you'll need a travel waiver, so head back to the plaza for now
- Head to Safety Services just in front of the monopod station and talk to Greta, the AI, about the Recycling centre and travel waiver
- Choose Orana as the Wellbeing Officer you wish to speak with, then use the monopod to head to the Aspiration Platform
2
Getting a travel waiver at the Aspiration Platform

- Once at the Aspiration Platform you'll be confronted by a concerned droid who needs you to clean up the place
- You don't actually have to worry about all the mess quite yet, instead you'll need to make a bigger one
- First go into the control room on the right, and use the control box near the door to turn off the sprinklers around the big tree
- Next, lure the Gang-Gang bird at the back of the stage, to the right when exiting the control room
- Throw a MiniK at the tree in the centre, and then go back and turn on the sprinklers to cause a massive mess
- Collect the bunting from the tree to attract Orana
- Talk to Orana about the Recycling centre to get the travel waiver
- Get Joey's chip out of the cleaning droid, and then head back to the monopod to the Recycling centre
3
Finding Leet's moonshine
- Go inside the Recycling centre and head down the stairs to the right to meet Leet, he'll demand you find his moonshine
- It's in another building, but you'll need to get past a hostile security droid first
- First go further into the building and use the Crusher control console to turn it off
- Now, get onto the conveyor belt and use your crowbar on the crusher
- Now go and turn the crusher back on, and quickly hide within the locker nearby
- Only come out when the droid is investigating the crusher, and turn it back on again
- That's the droid dealt with, make sure to pick your crowbar up off the floor
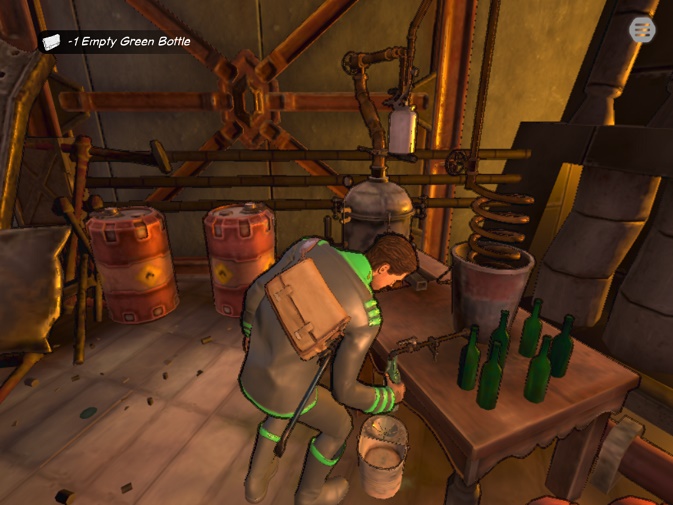
- Now you can head back up the stairs and follow the walkway into the next building
- Stick to the right to find the furnace, and use the glass bottle using the tap at the bottom of the stairs, and head back to Leet
4
Finding the real Leet

- Talk to Leet about your U-Chip and you'll discover he's not Leet, he's a murdering psycho
- Use the Empty glass bottle on the table to free yourself
- Take the unicorn from Jimmy's table and the cleaver on the floor before heading back towards the walkway the droid was guarding
- This time stick to the left, but don't go up the ladder
- Use your crowbar on the Rusty box to open it, and turn off the switch
- Head over to the gas control valve and turn it to break it off
- Head up the ladder from before and use the cleaver on the tether for the sign to take it down
- Head back to the gas valve and use the plastic unicorn on the broken light that has been knocked down
- Head back to the switch and turn it on for an explosion
- Now head back into the furnace room where you found the moonshine
- The furnace will have died out and you can head up a ladder at the back, where you will find the actual real Leet, and a small child
5
Hacking MINOS
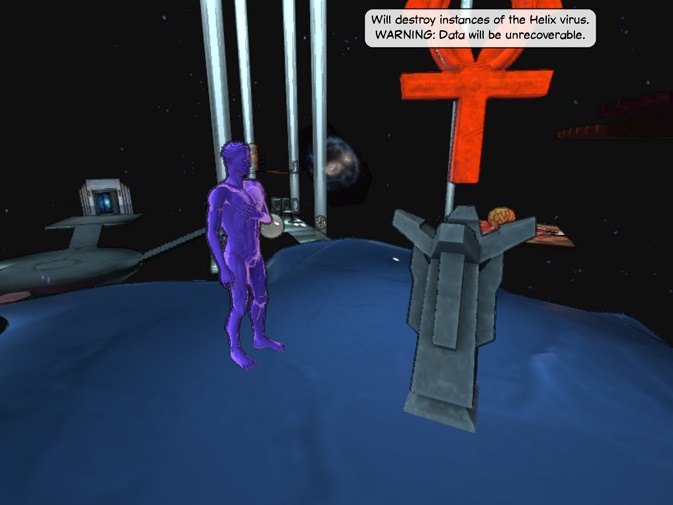
- Finally we've found the real Leet - exhaust his dialogue options to keep moving forward
- Foster's retro Schriebmann Port allows him to enter LINCspace, and hack into MINOS using a digital avatar
- Sit in Leet's chair and enter the digital world, and you'll have to solve some very simple puzzles before deleting Leet and Graham's data from MINOS to make them free men
- Walk into the floating icons here to teleport - enter the first one, and then collect the two items on the pedastals
- Use the repair tool on the broken stairs back in the last room, go up
- Enter the floating icon on the left, use the repair tape in the new room, and then collect the item and return
- Use the Blind tool on the giant eye in the last room
- Enter the room to the right of the eye, collect the Divine Wrath tool and return
- Go back into the room with the eye and use the chess knight icon
- Use the Divine Wrath icon on the virus, then return and take the icon to the left of the eye
- Use the repair tool on the damaged cog to complete the path, and take the decrypt tool
- Head back to the room with the safe, and use the decrypt tool to open it
- Back in the main room, use the fire extinguisher to open the final path and access MINOS
- You can use the converter in this room with the core log you picked up, then use the Navigator to complete the path
6
Solving the data puzzle with Elliot, Graham, and Greta

- In here you'll meet the Greta AI again, and she'll allow you to move data around in this puzzle
- Essentially you need to move all of the data and programs onto the Greta AI
- You can only stack them according to height - programs can be placed atop one another but the one underneath must be larger - focus on moving the largest onto the AI first, and then work from there step by step
- Follow these instructions
- Red data to AI
- Yellow to Graham
- Red to Elliot
- Yellow to Elliot
- Blue to AI
- Yellow to AI
- Red to Graham
- Yellow to Graham
- Green to AI
- Yellow to Elliot
- Red to AI
- Yellow to AI
- That should be everything complete!
- Once you're out of MINOS you'll find Joey with a new droid body, and a new goal - head back to Graham's apartment and view the messages on his terminal
